
One of the things Justin and I were most excited about when purchasing our new home, was creating an outdoor setting that felt lush and serene. Throughout our travels, we always stop to admire homes covered in flowering vines situated among the most unreal landscaping, and longed for the day when we would have the opportunity to create a little oasis of our own. We knew we wanted to grow something on the side of our house, we just didn’t know how. When we began researching ideas online we were surprised to find there was very little information on how to build vertical trellises and training vines. So, Justin and I sat down and figured our how to create a jasmine wall that literally won’t stop growing!
Below is a foolproof guide on how we created a simple and incredibly beautiful garden trellis at home.
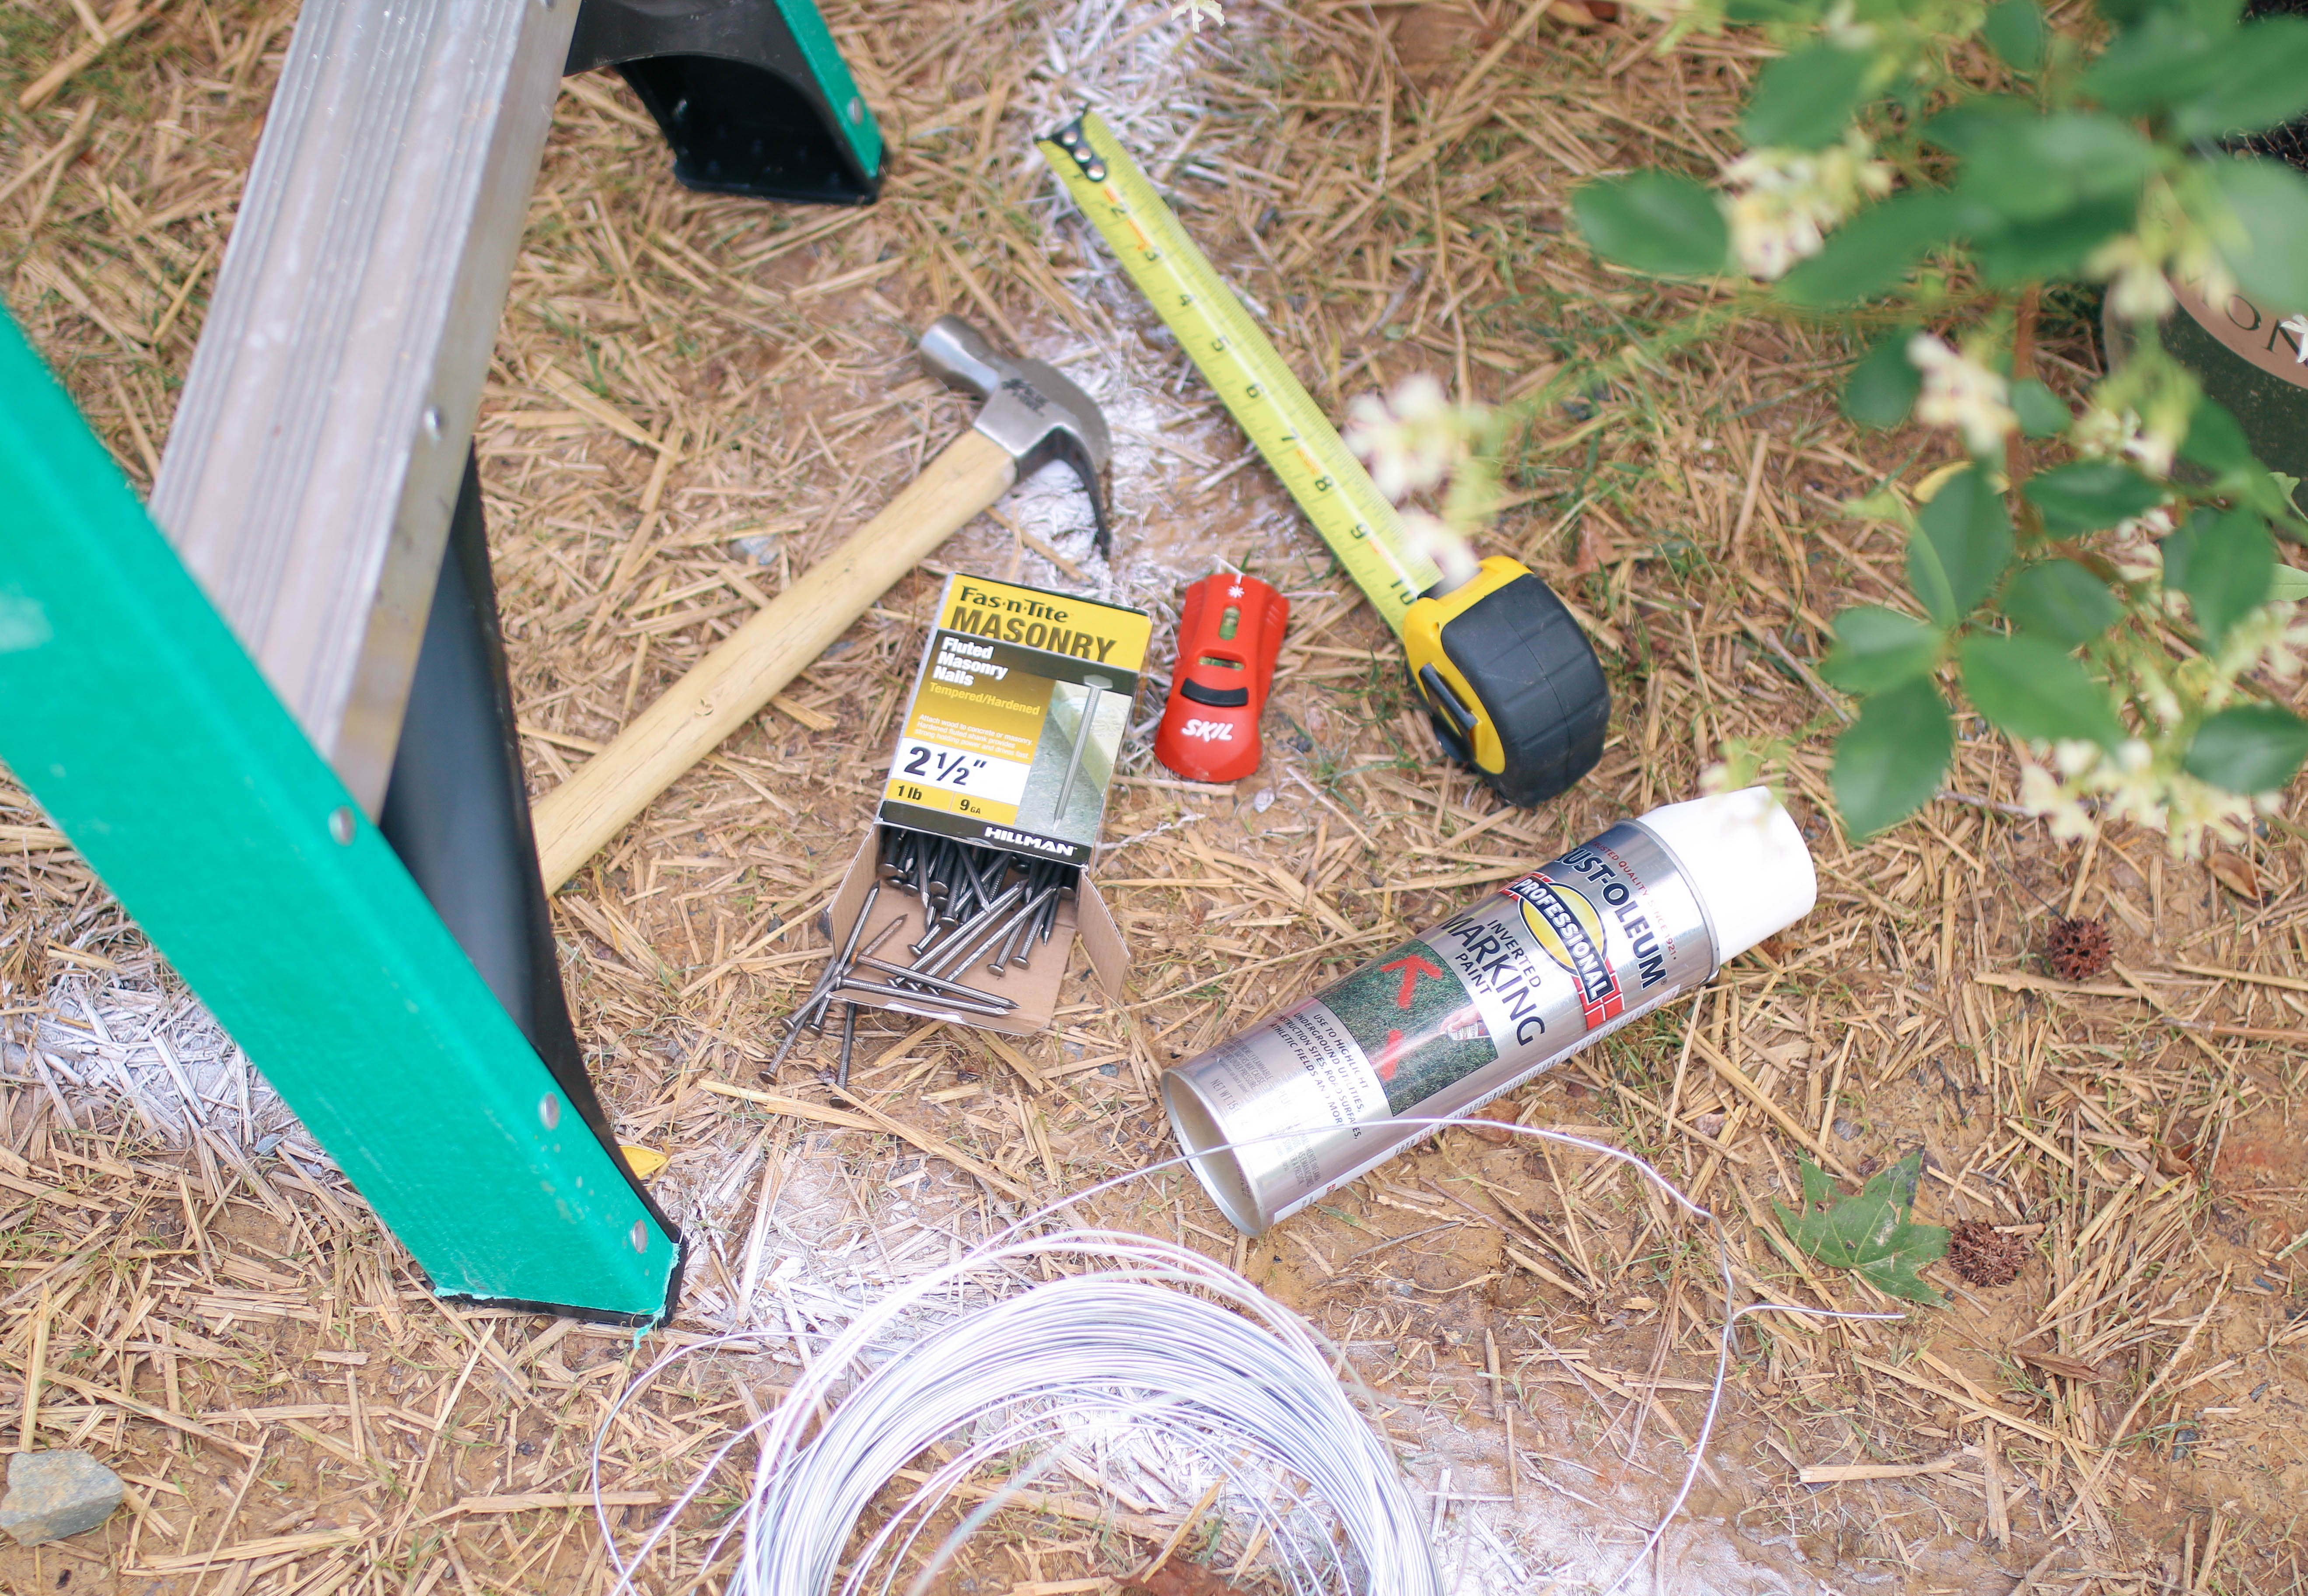
Here’s What You’ll Need:
- Galvanized Wire
- Eye Hooks or Masonry Nails*
- Wire Snips
- Measuring Tape
- Hammer
- Maddison Jasmine
- Laser-level
- Ladder
- Pencil and Marking Chalk
*Use masonry nails if installing wall against a brick surface (like we did). They are built for anchoring into the mortar of brick joints and offer more support. Eye hooks are ideal for softer materials such as wood and siding.

Step 1: Picking the Right Plant/ Why We Chose ‘Madison Jasmine’
The key to success for building a trellis is picking the right plant for your desired location. It’s important that you first consider the climate and light conditions before making your purchase; you’ll want something that will survive the winter but also endure the summer. Garden centers are great at helping to identify regionally appropriate options and ones that are best fit for the characteristics of your garden/ home.
You’ll want to choose a plant within the ‘vine’ family. They’re stems are super flexible, and can be guided and trained to grow on vertical surfaces; A great option too for those wanting instant results (?).
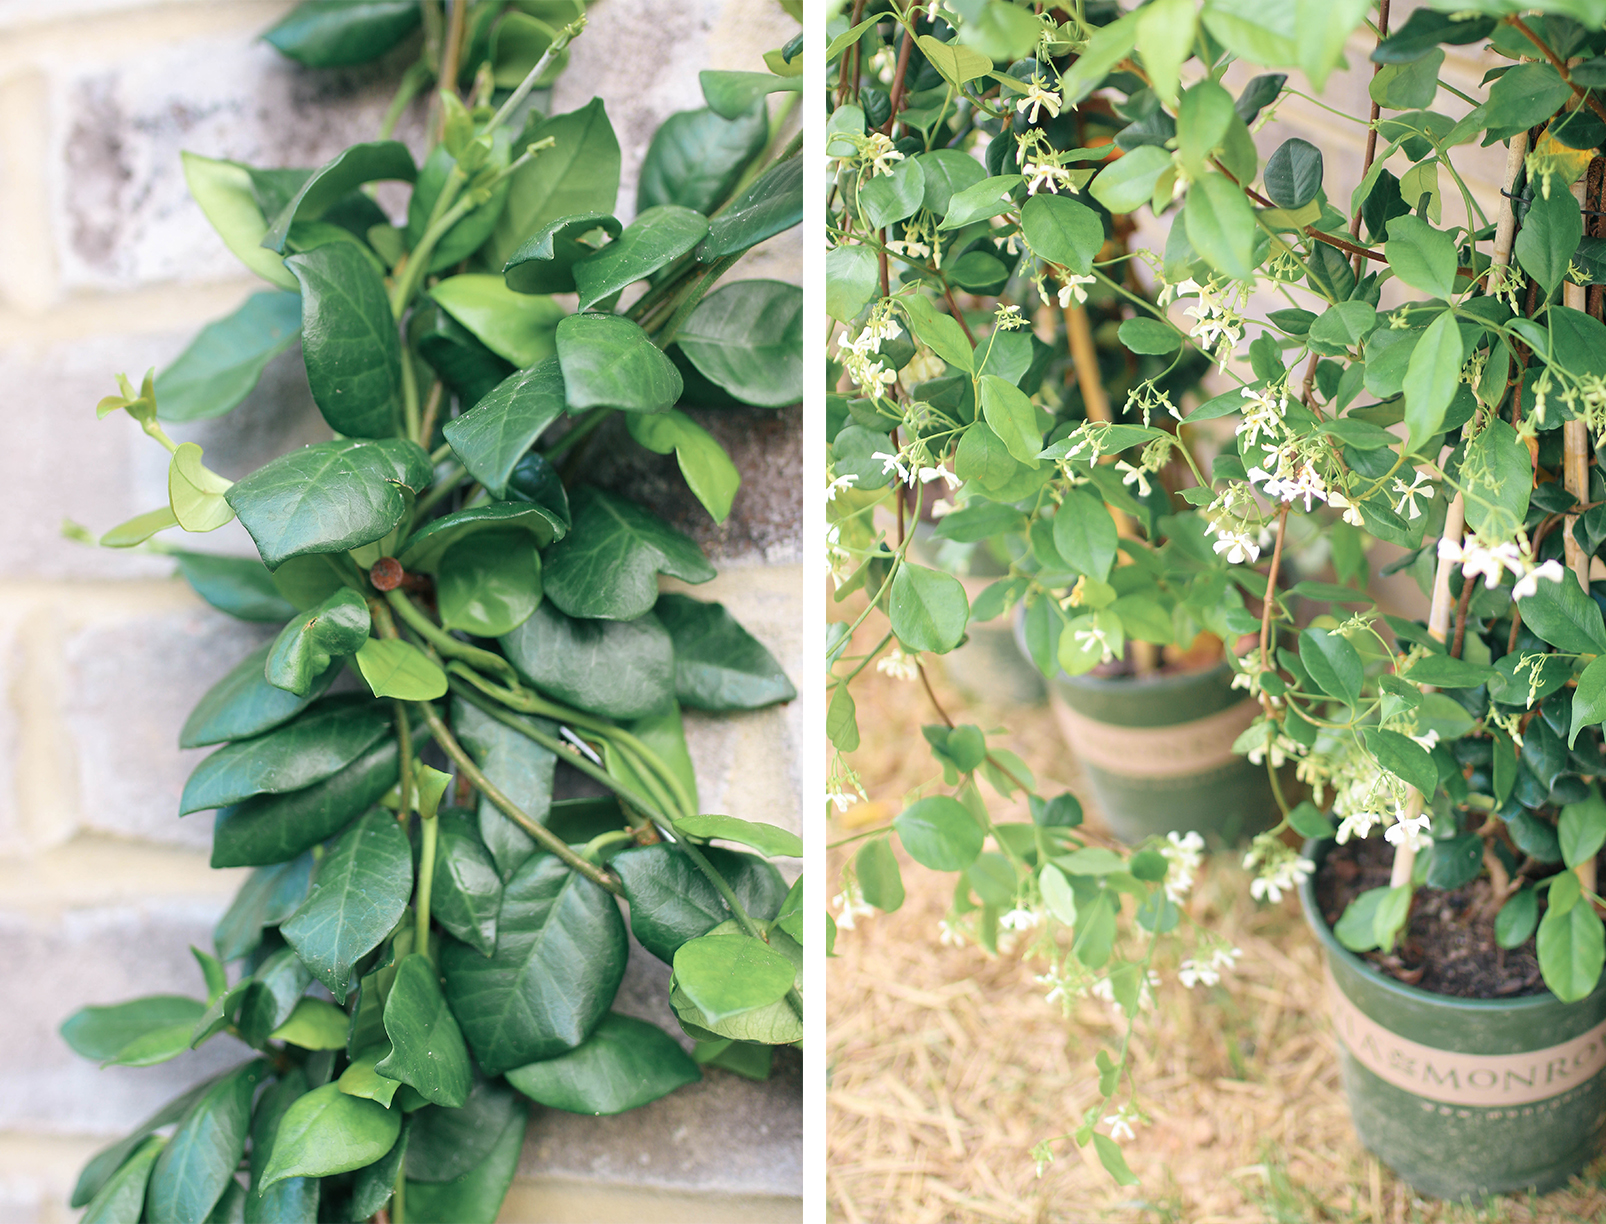
When making our selection we knew we wanted a flowering vine. While we loved wisteria and climbing hydrangeas both are deciduous plants (looses it’s leaves seasonally). Madison Jasmine on the other hand is an evergreen vine that produces clusters of creamy-white flowers that bloom 5-6 months out of the year (April to mid-June with lighter flushes throughout September depending on your location). The exterior of our home is a white-washed brick and makes for the perfect contrast against Madison Jasmine’s dark leaves.
Tip: Choosing a mature plant that already has long tendrils will give you a head start.

Step 2: Decide on Your Pattern
Vines can be used many ways: around tree trunks, atop arbors to create natural shaded spaces, as ground cover in place of grass, shrubs or mulch, or in our case, for pure aesthetic. As it relates to a vertical lattice, which is what we created, we chose a “Belgian Fence” (or crisscross) pattern. The crisscross pattern lends itself well to vines and is very simple to layout (We’re still patting ourselves on the back for that one). Other options to consider are: checkerboard, arbors or full coverage.
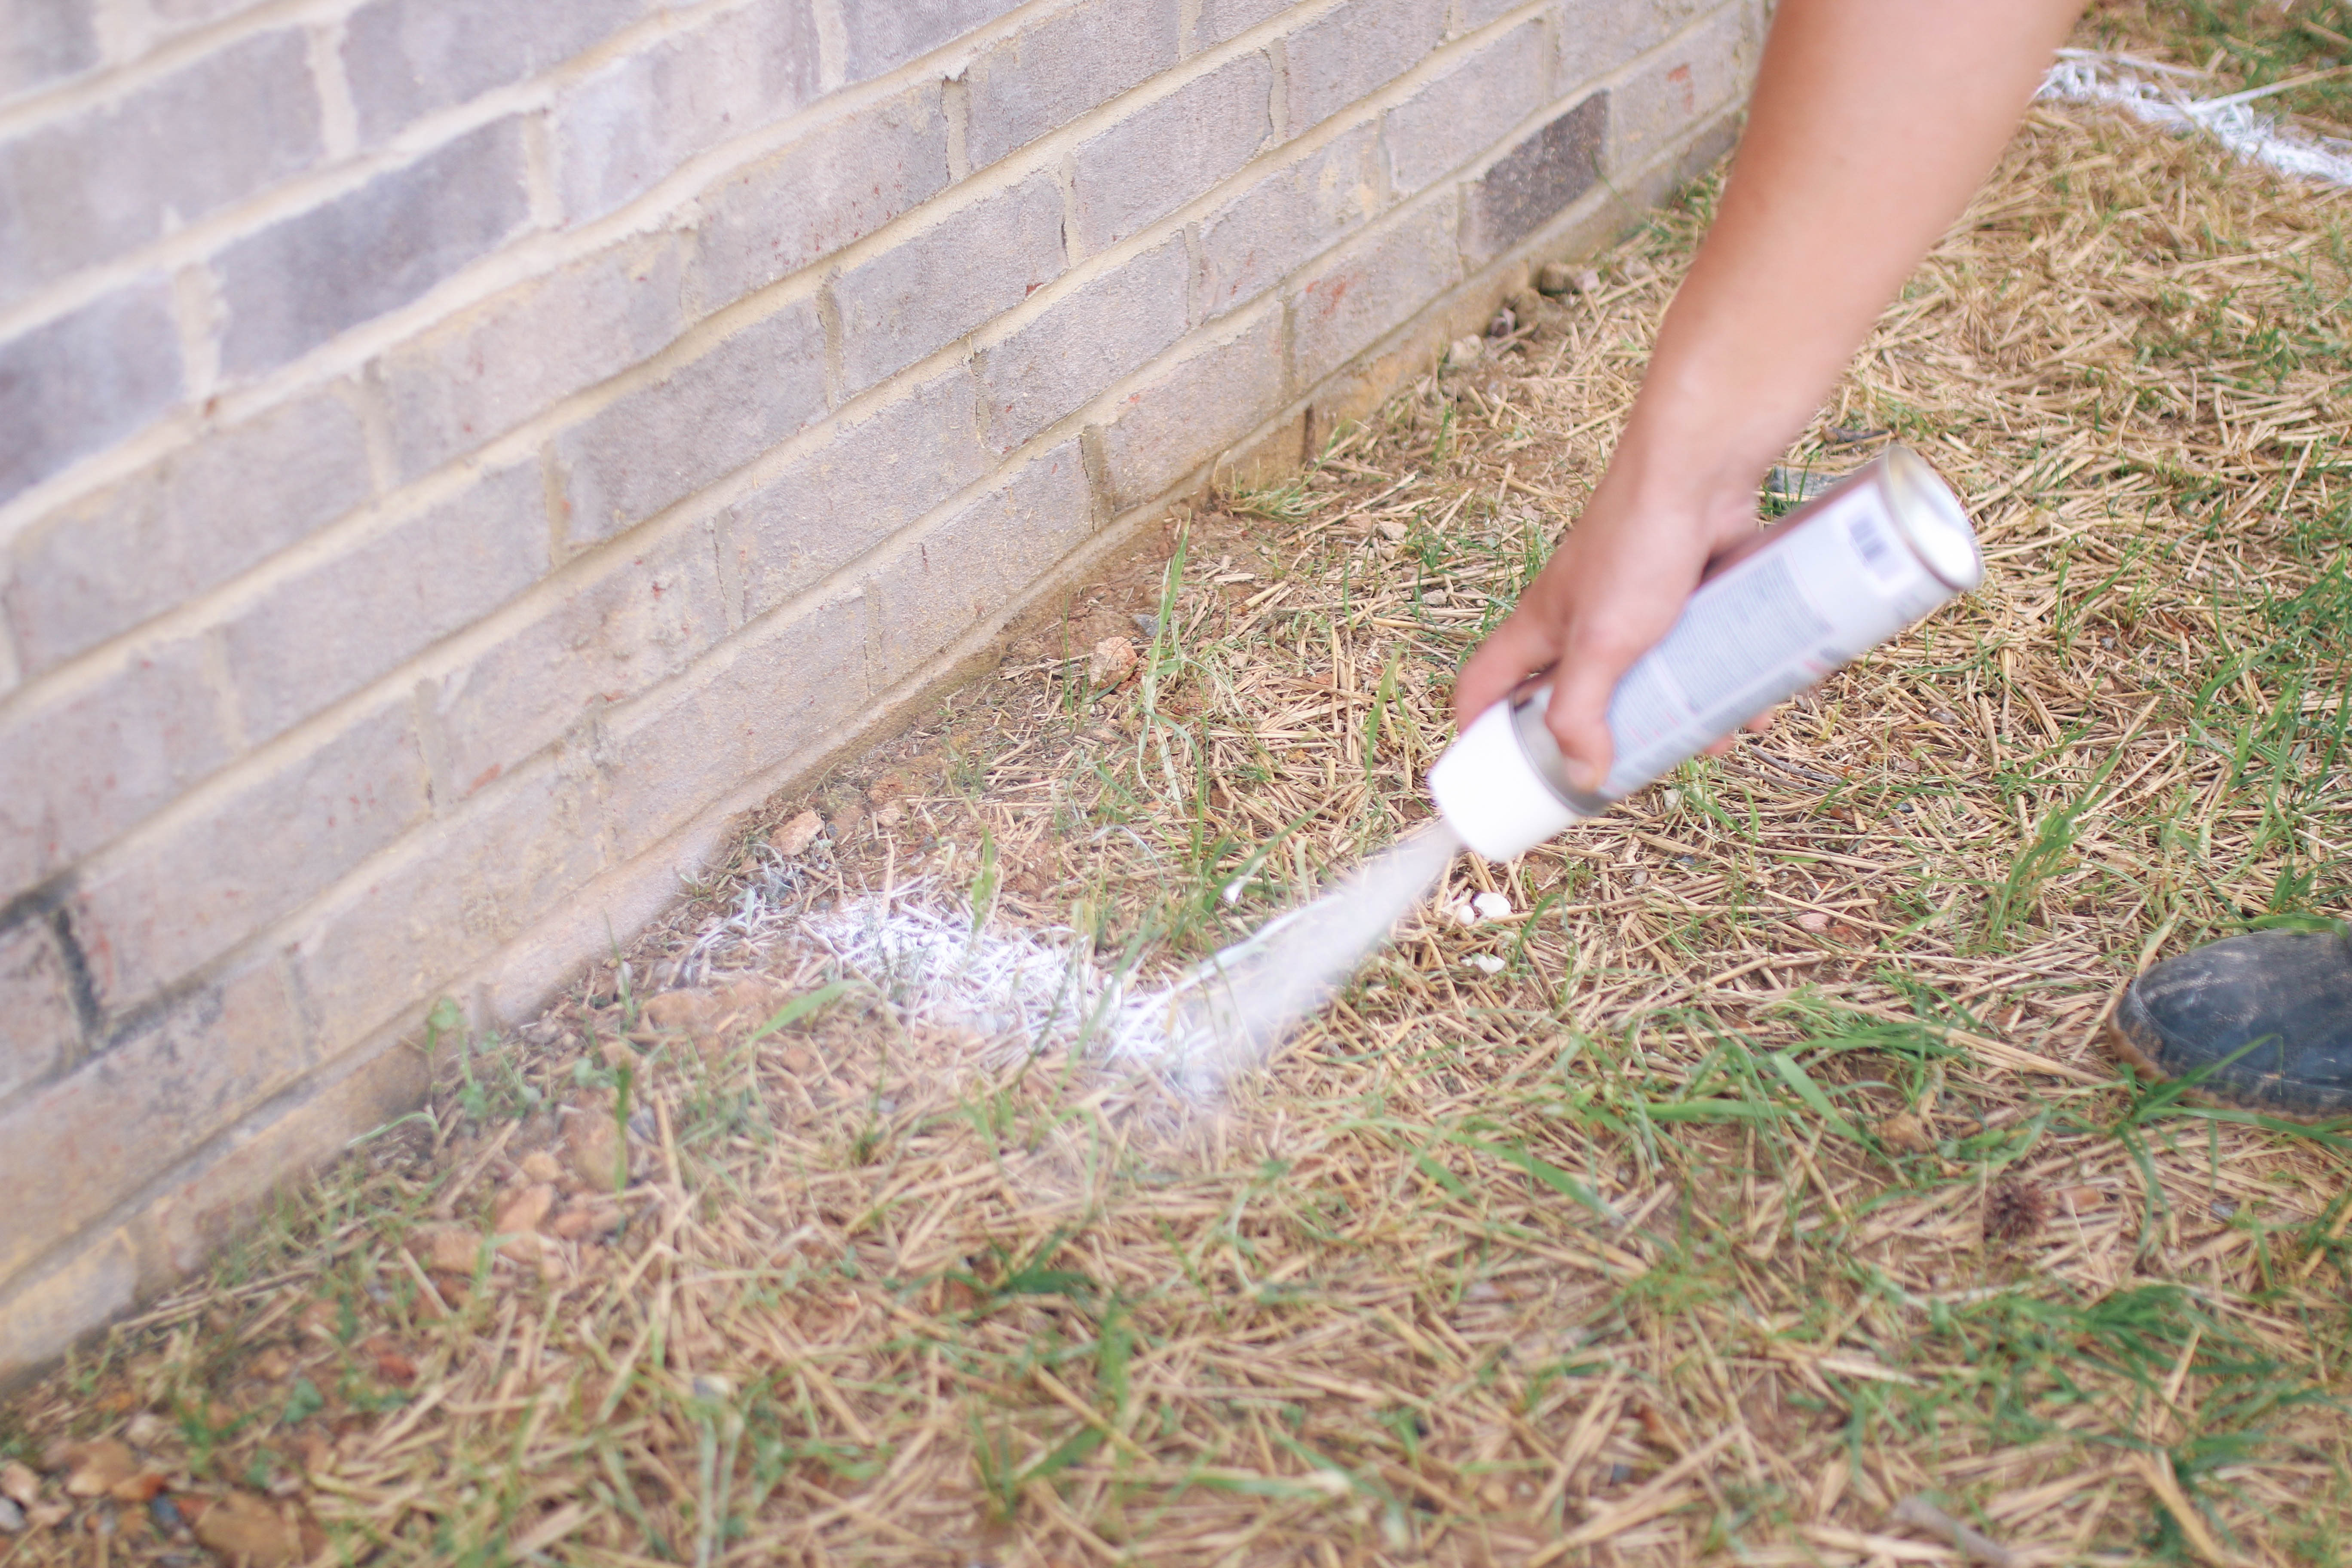
Step 3: Space Out Your Pattern, Measure & Mark
Once you’ve settled on a pattern mark, measure and install the structure of your trellis. I’ve included step-by-step instructions below.
- Determine the overall width of your lattice. Using marking chalk (A temporary, fast-drying tool for marking grass), mark the ground where the two ends fall. Then measure and mark the center of the ground between those two ends (You should have a total of three marks).
- Using a hammer, install one masonry nail into the wall six inches above where each of the three ground marks were made. Leave half of the nail exposed as this visible portion is where you will eventually wrap the galvanized wire for the entire structure.
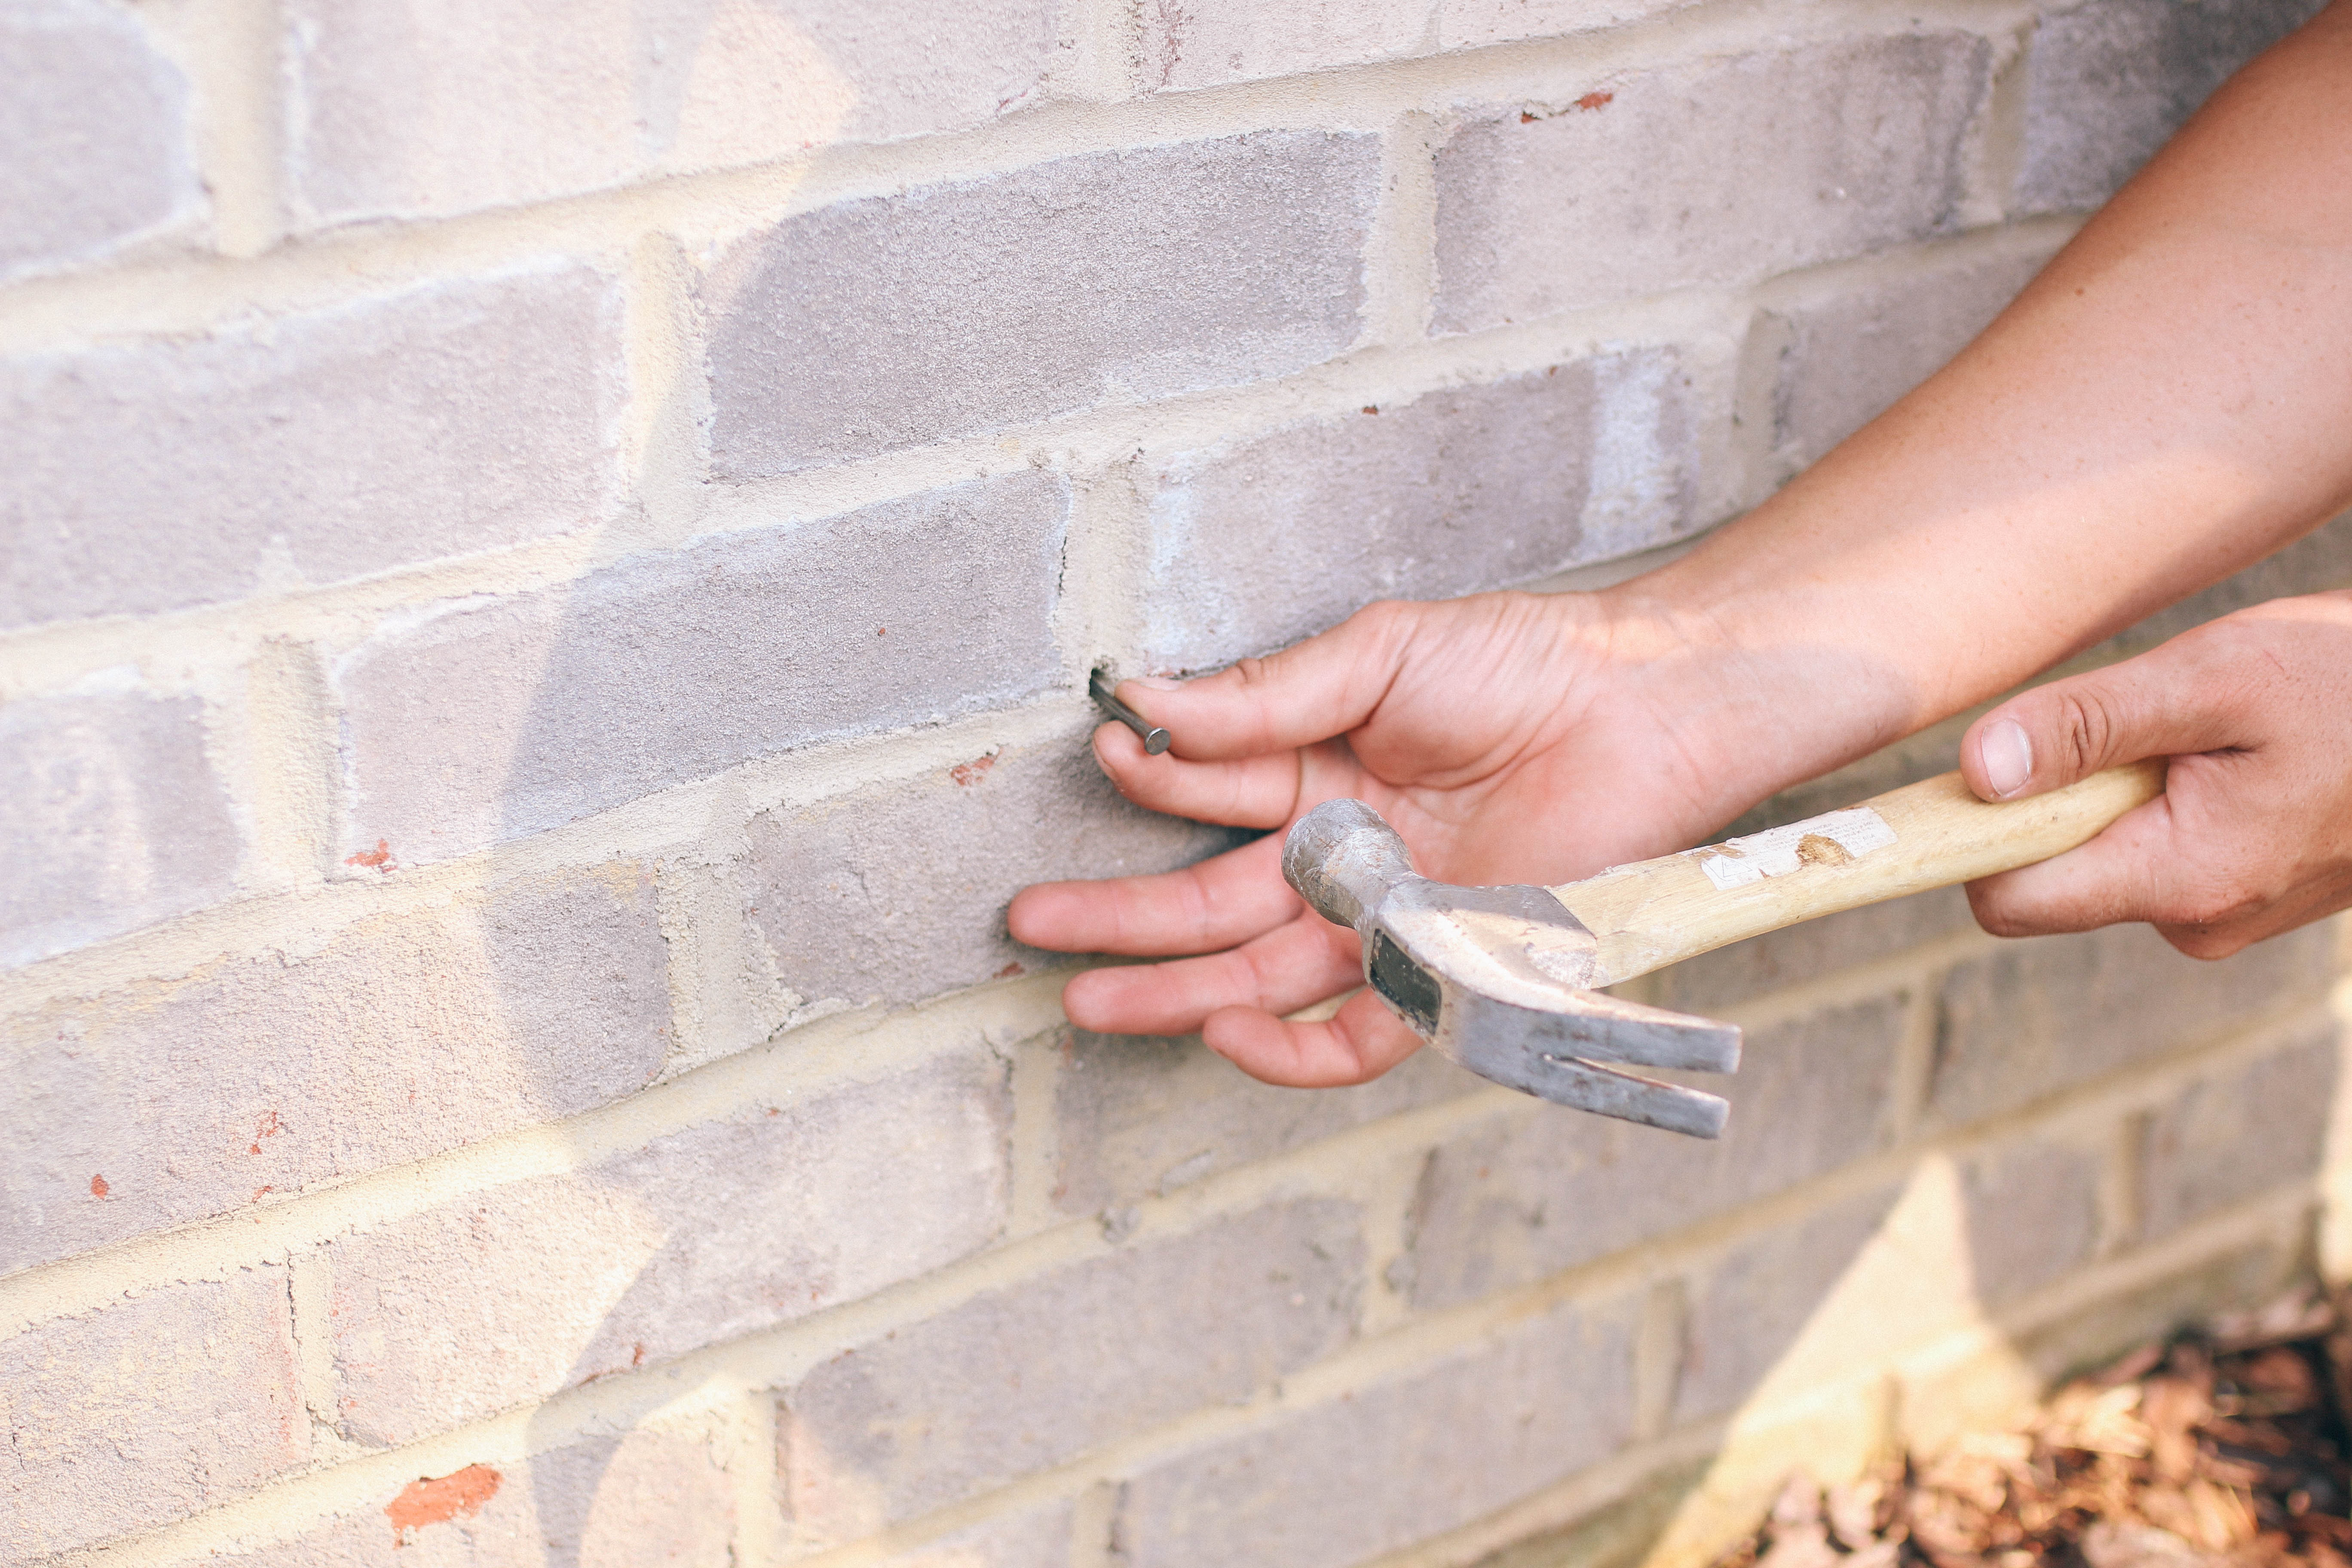
- Next determine the desired height of your structure. Using a laser-level, measure and install masonry nails into the wall directly above and in-line with the three bottom nails (Just to give you a general idea, ours is 8 feet high).
- Measure and mark the center of the height between the top and bottom nails on each side – install one nail at those marked spots (these are nails 2 and 6 in the “Step 4” diagram below).
- There should be a total of eight nails.
Step 4: Install and Secure the Galvanized Wire
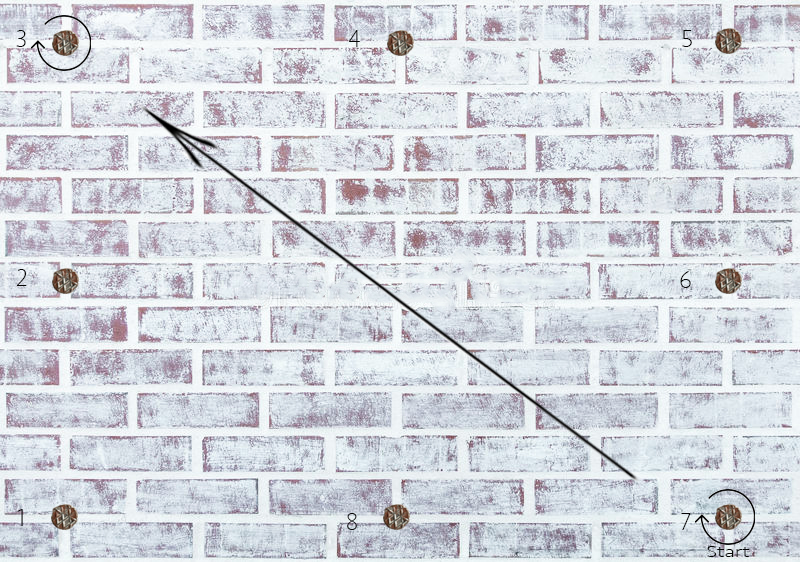
Please refer to the below diagram.
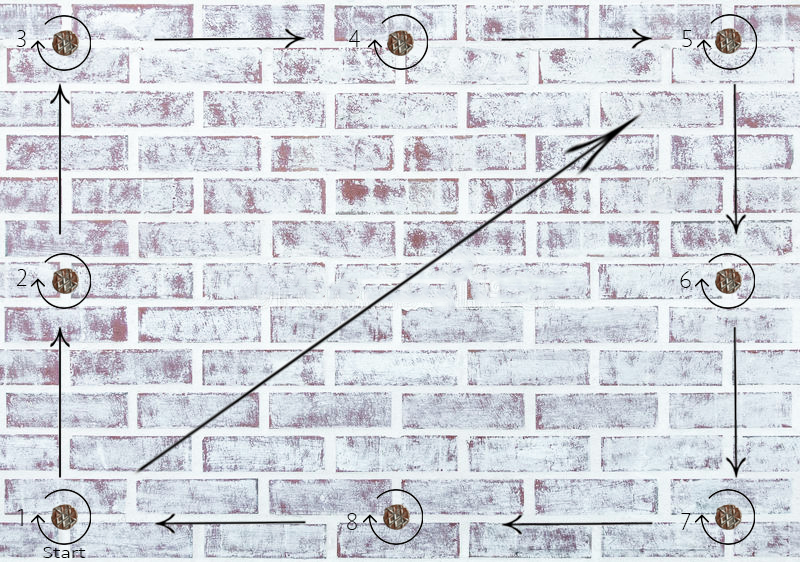
- Starting at nail number 1, take the raw end of the galvanized wire and wrap it several times around the nail in a clockwise direction. Using the remaining few inches, secure the wire in place by wrapping it back around itself (Do not cut any wire).
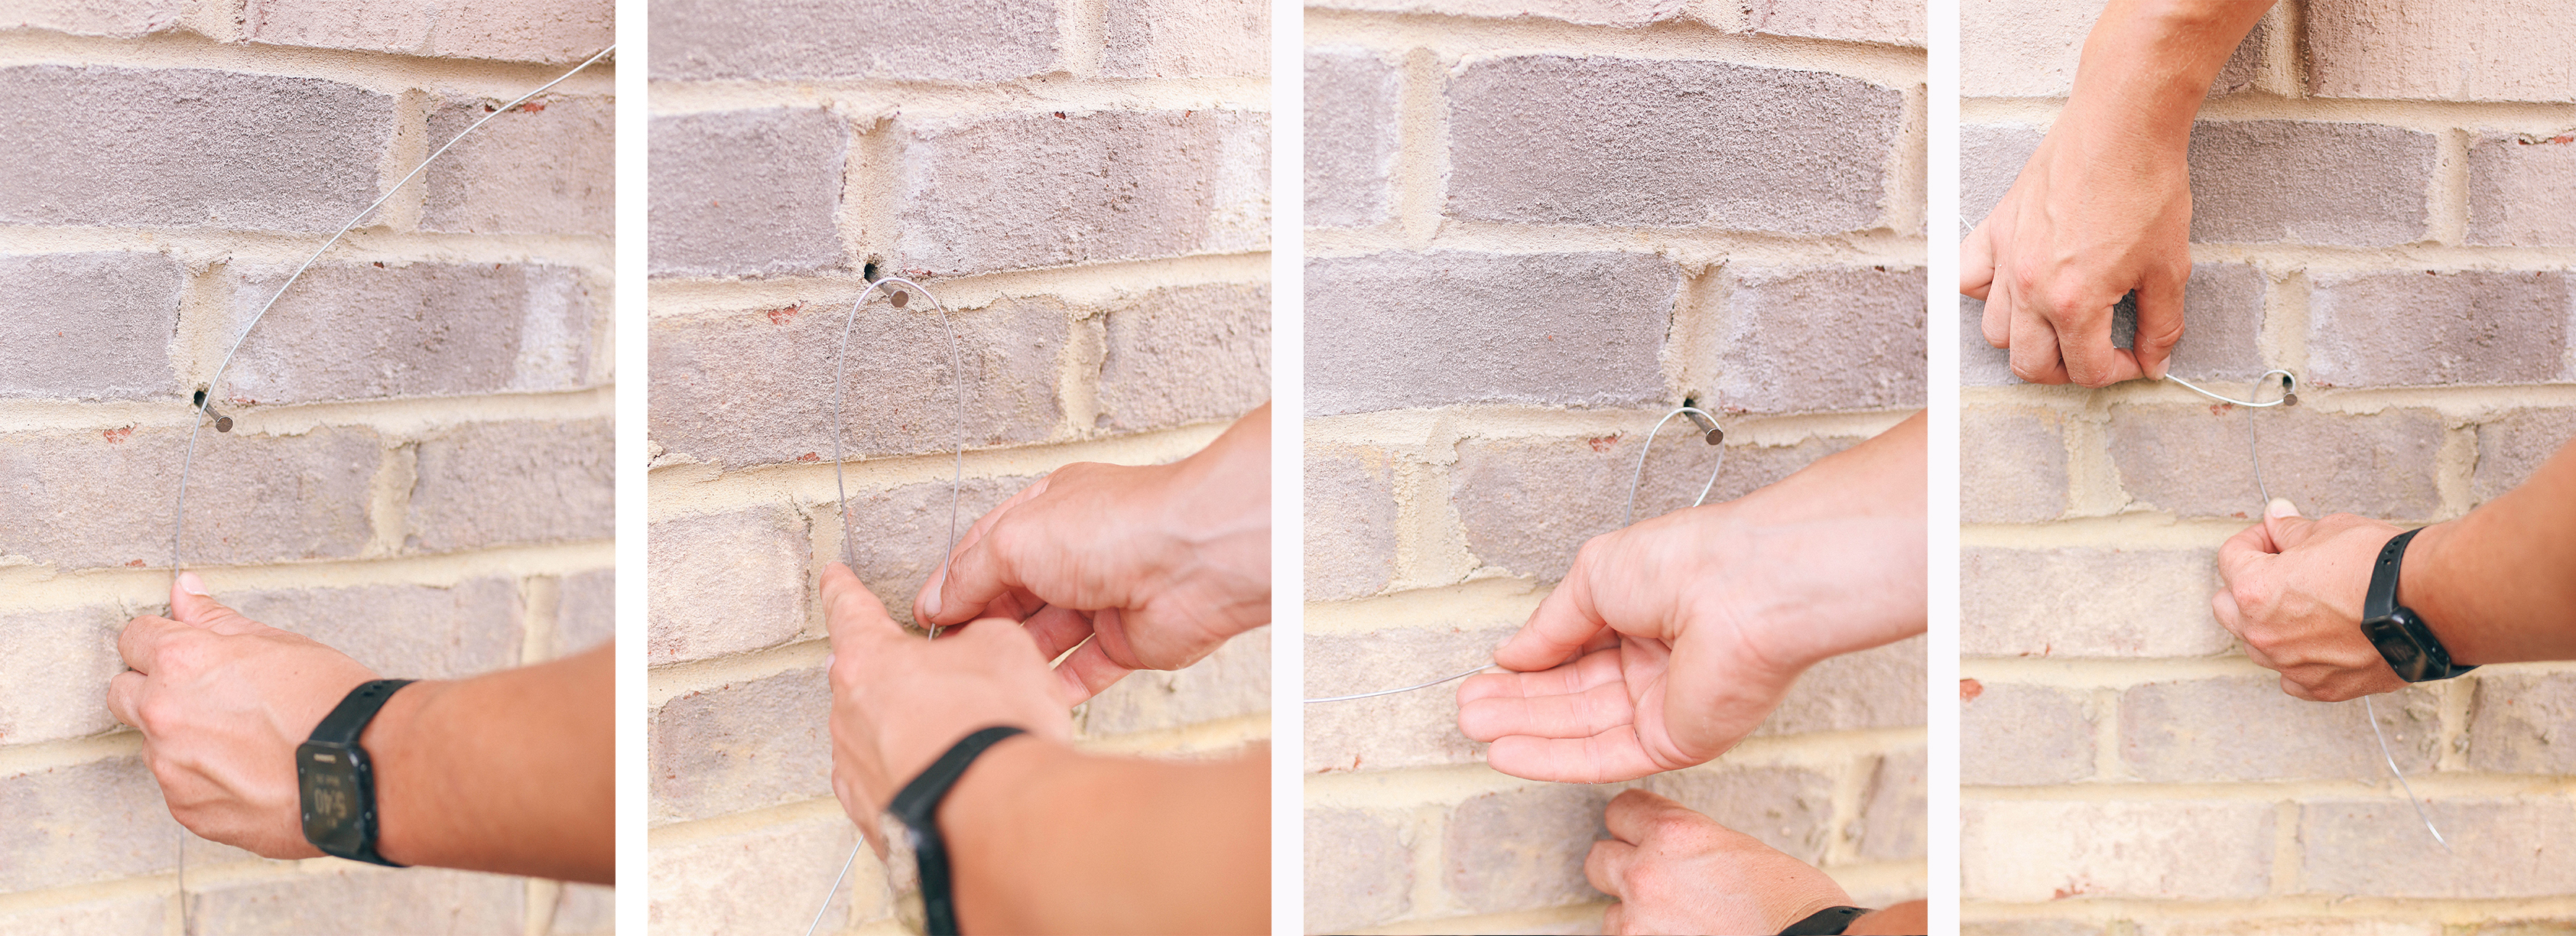
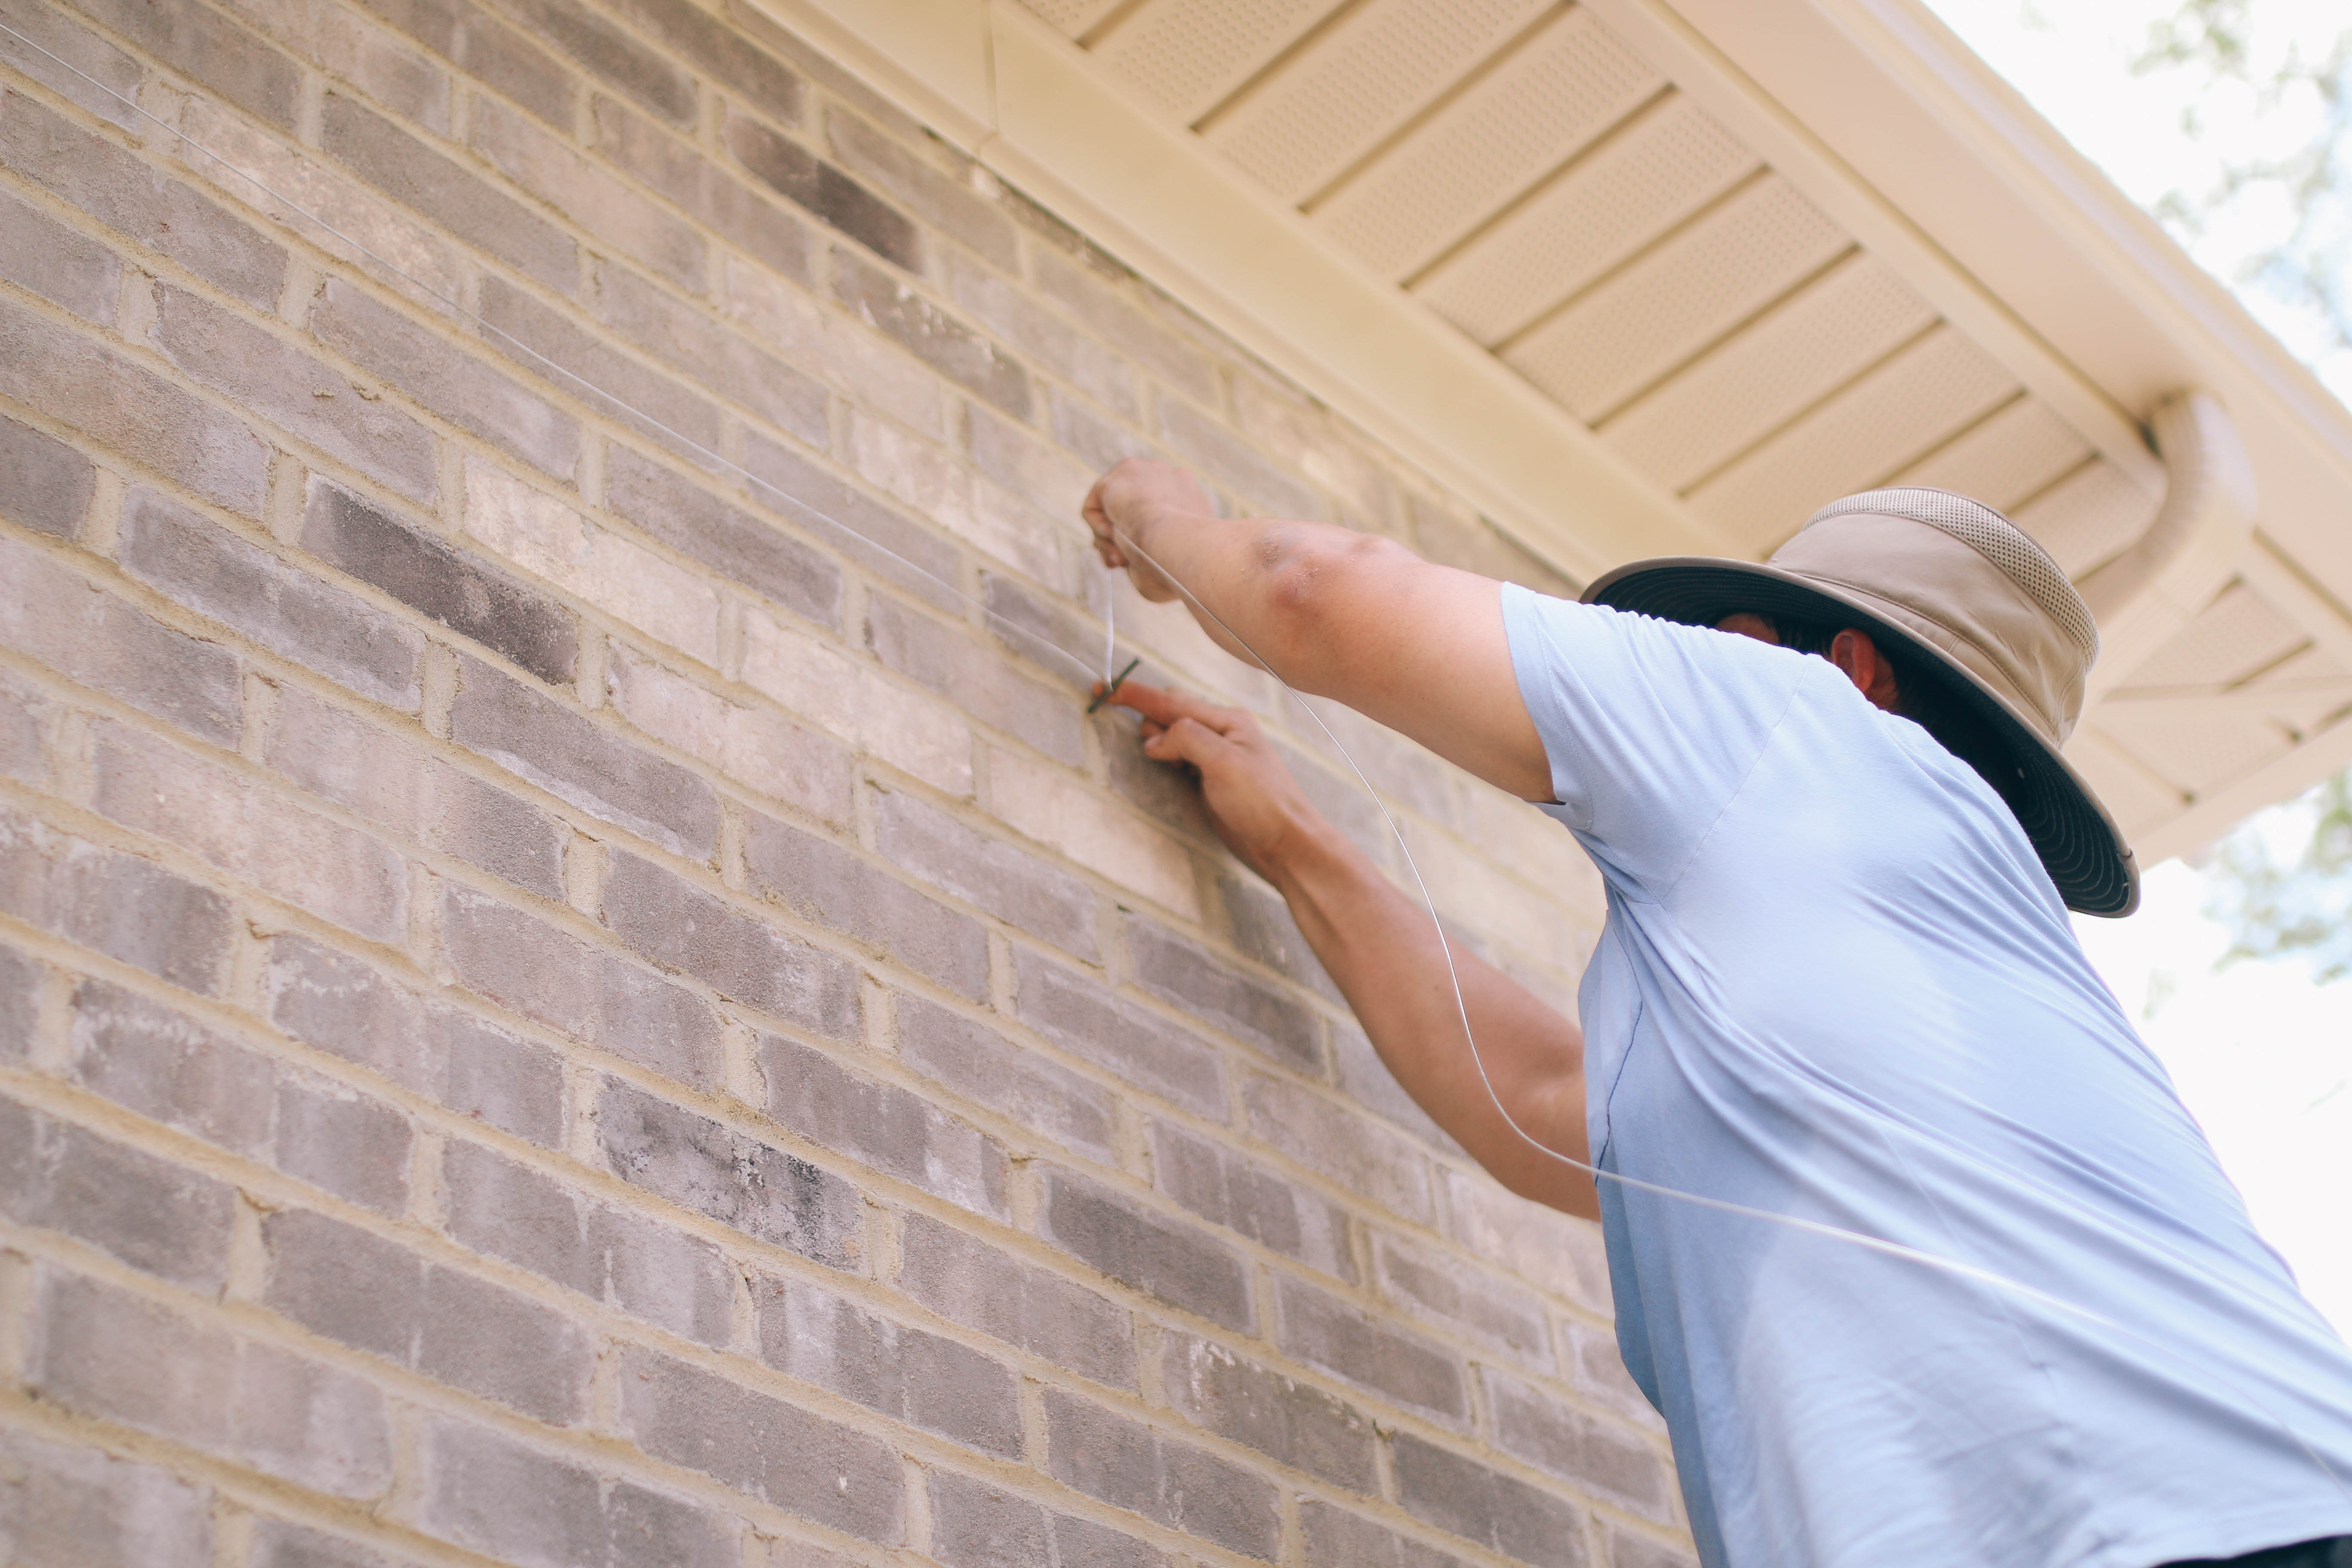
- Taking the spool of wire, pull it tightly and extend to nail number 2. Wrap it several times around the nail in a clockwise direction.
- Continue extending and wrapping the wire in a clockwise motion for nails 3 through 8 and from 8 back to 1 (Again, do not cut the wire).
- Start creating the crisscross design by taking the wire from nail number 1 and extending it to nail 5. Wrap the wire twice around the nail in a clockwise motion.
- You can now CUT the wire. Secure the remaining few inches in place by wrapping it back around itself.
Please refer to the below diagram.
- Starting at nail number 7, take the raw end of the galvanized wire and wrap it several times around the nail in clockwise direction (Do not cut any wire).
- Taking the spool of wire, pull it tightly and extend to nail number 3. Wrap it several times around the nail in a clockwise direction.
- Leaving a few inches, you can now CUT the wire. Secure the remaining few inches in place by wrapping it back around itself.
Please refer to the below diagram.
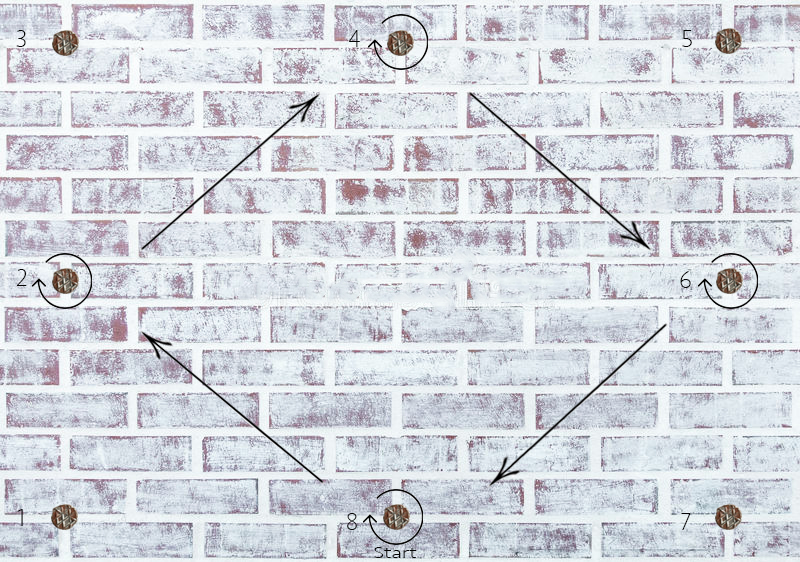
- Starting at nail number 8, take the raw end of the galvanized wire and wrap it several times around the nail in clockwise direction (Again, do not cut any wire).
- Taking the spool of wire, pull it tightly and continue extending and wrapping it in a clockwise motion from nails 2 to 4, 4 to 6 and from 6 back to 8.
- Leaving a few inches, you can now CUT the wire. Secure the remaining few inches in place by wrapping it back around itself.
Your final pattern should look like such…

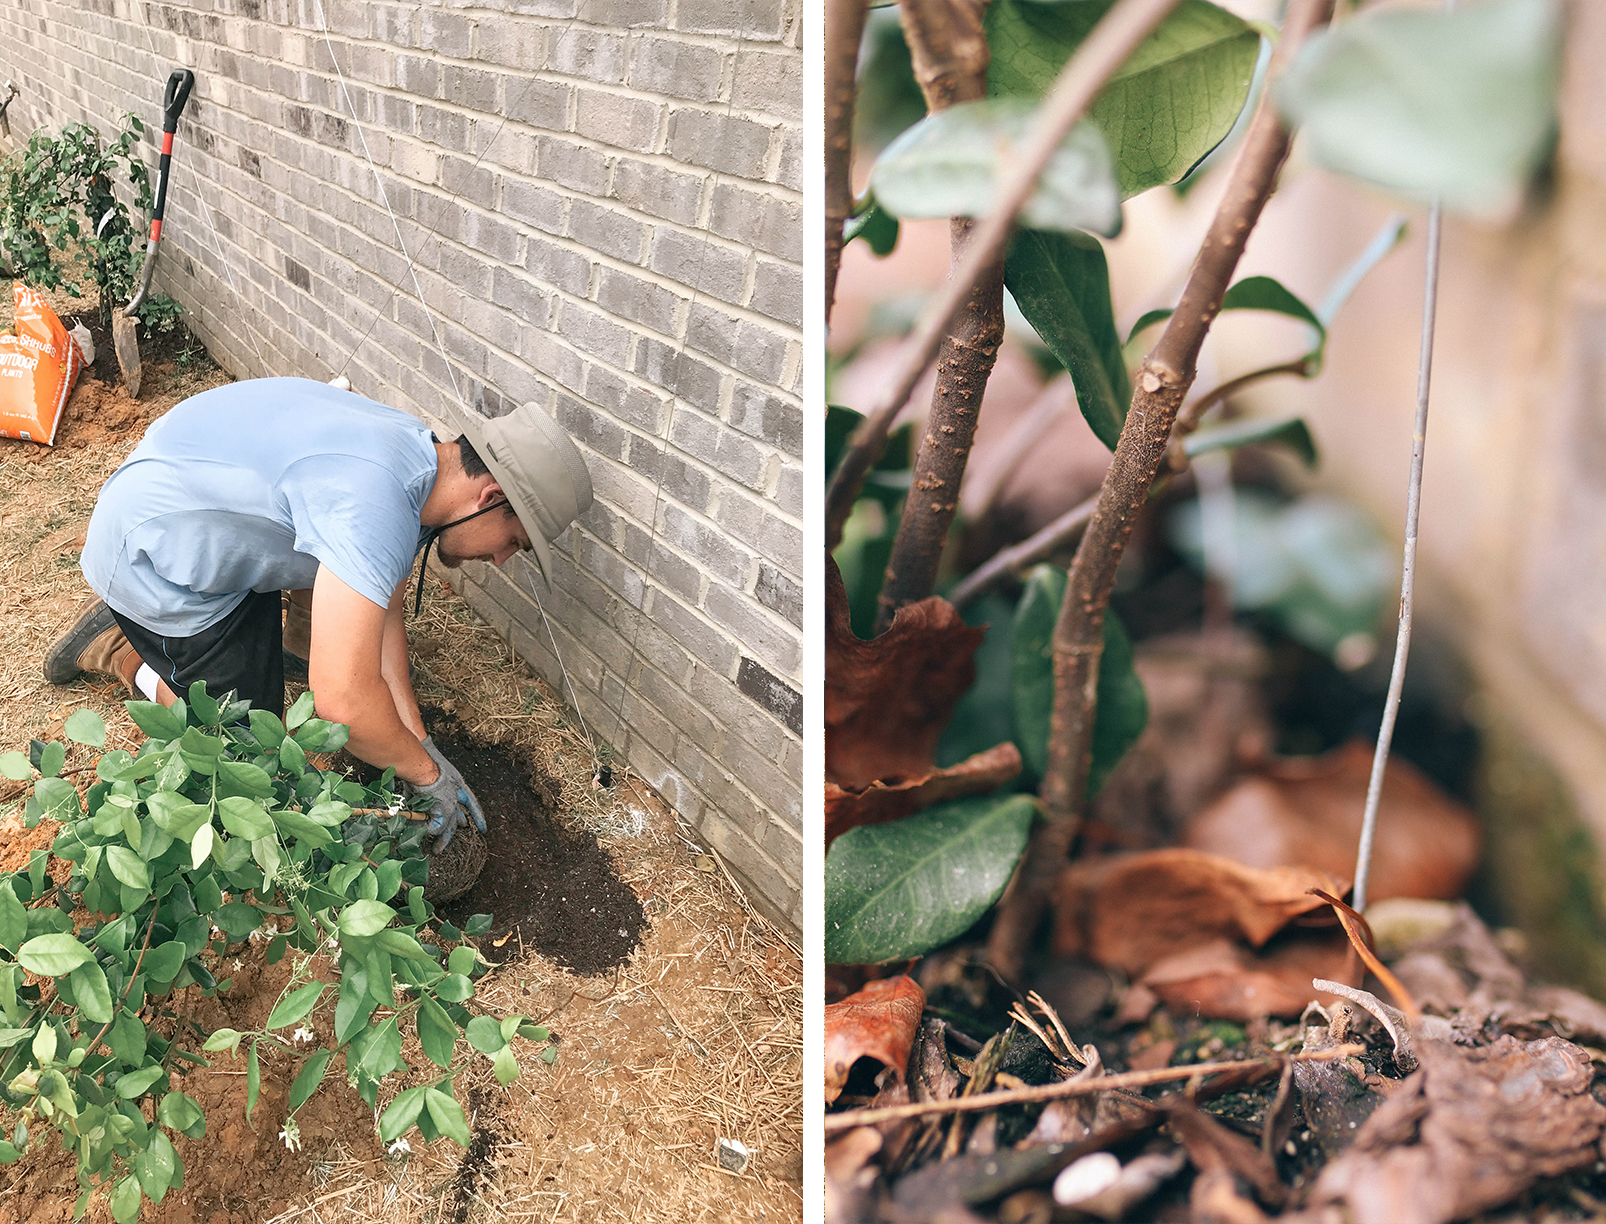
Step 5: Plant & Entwine Your Plant
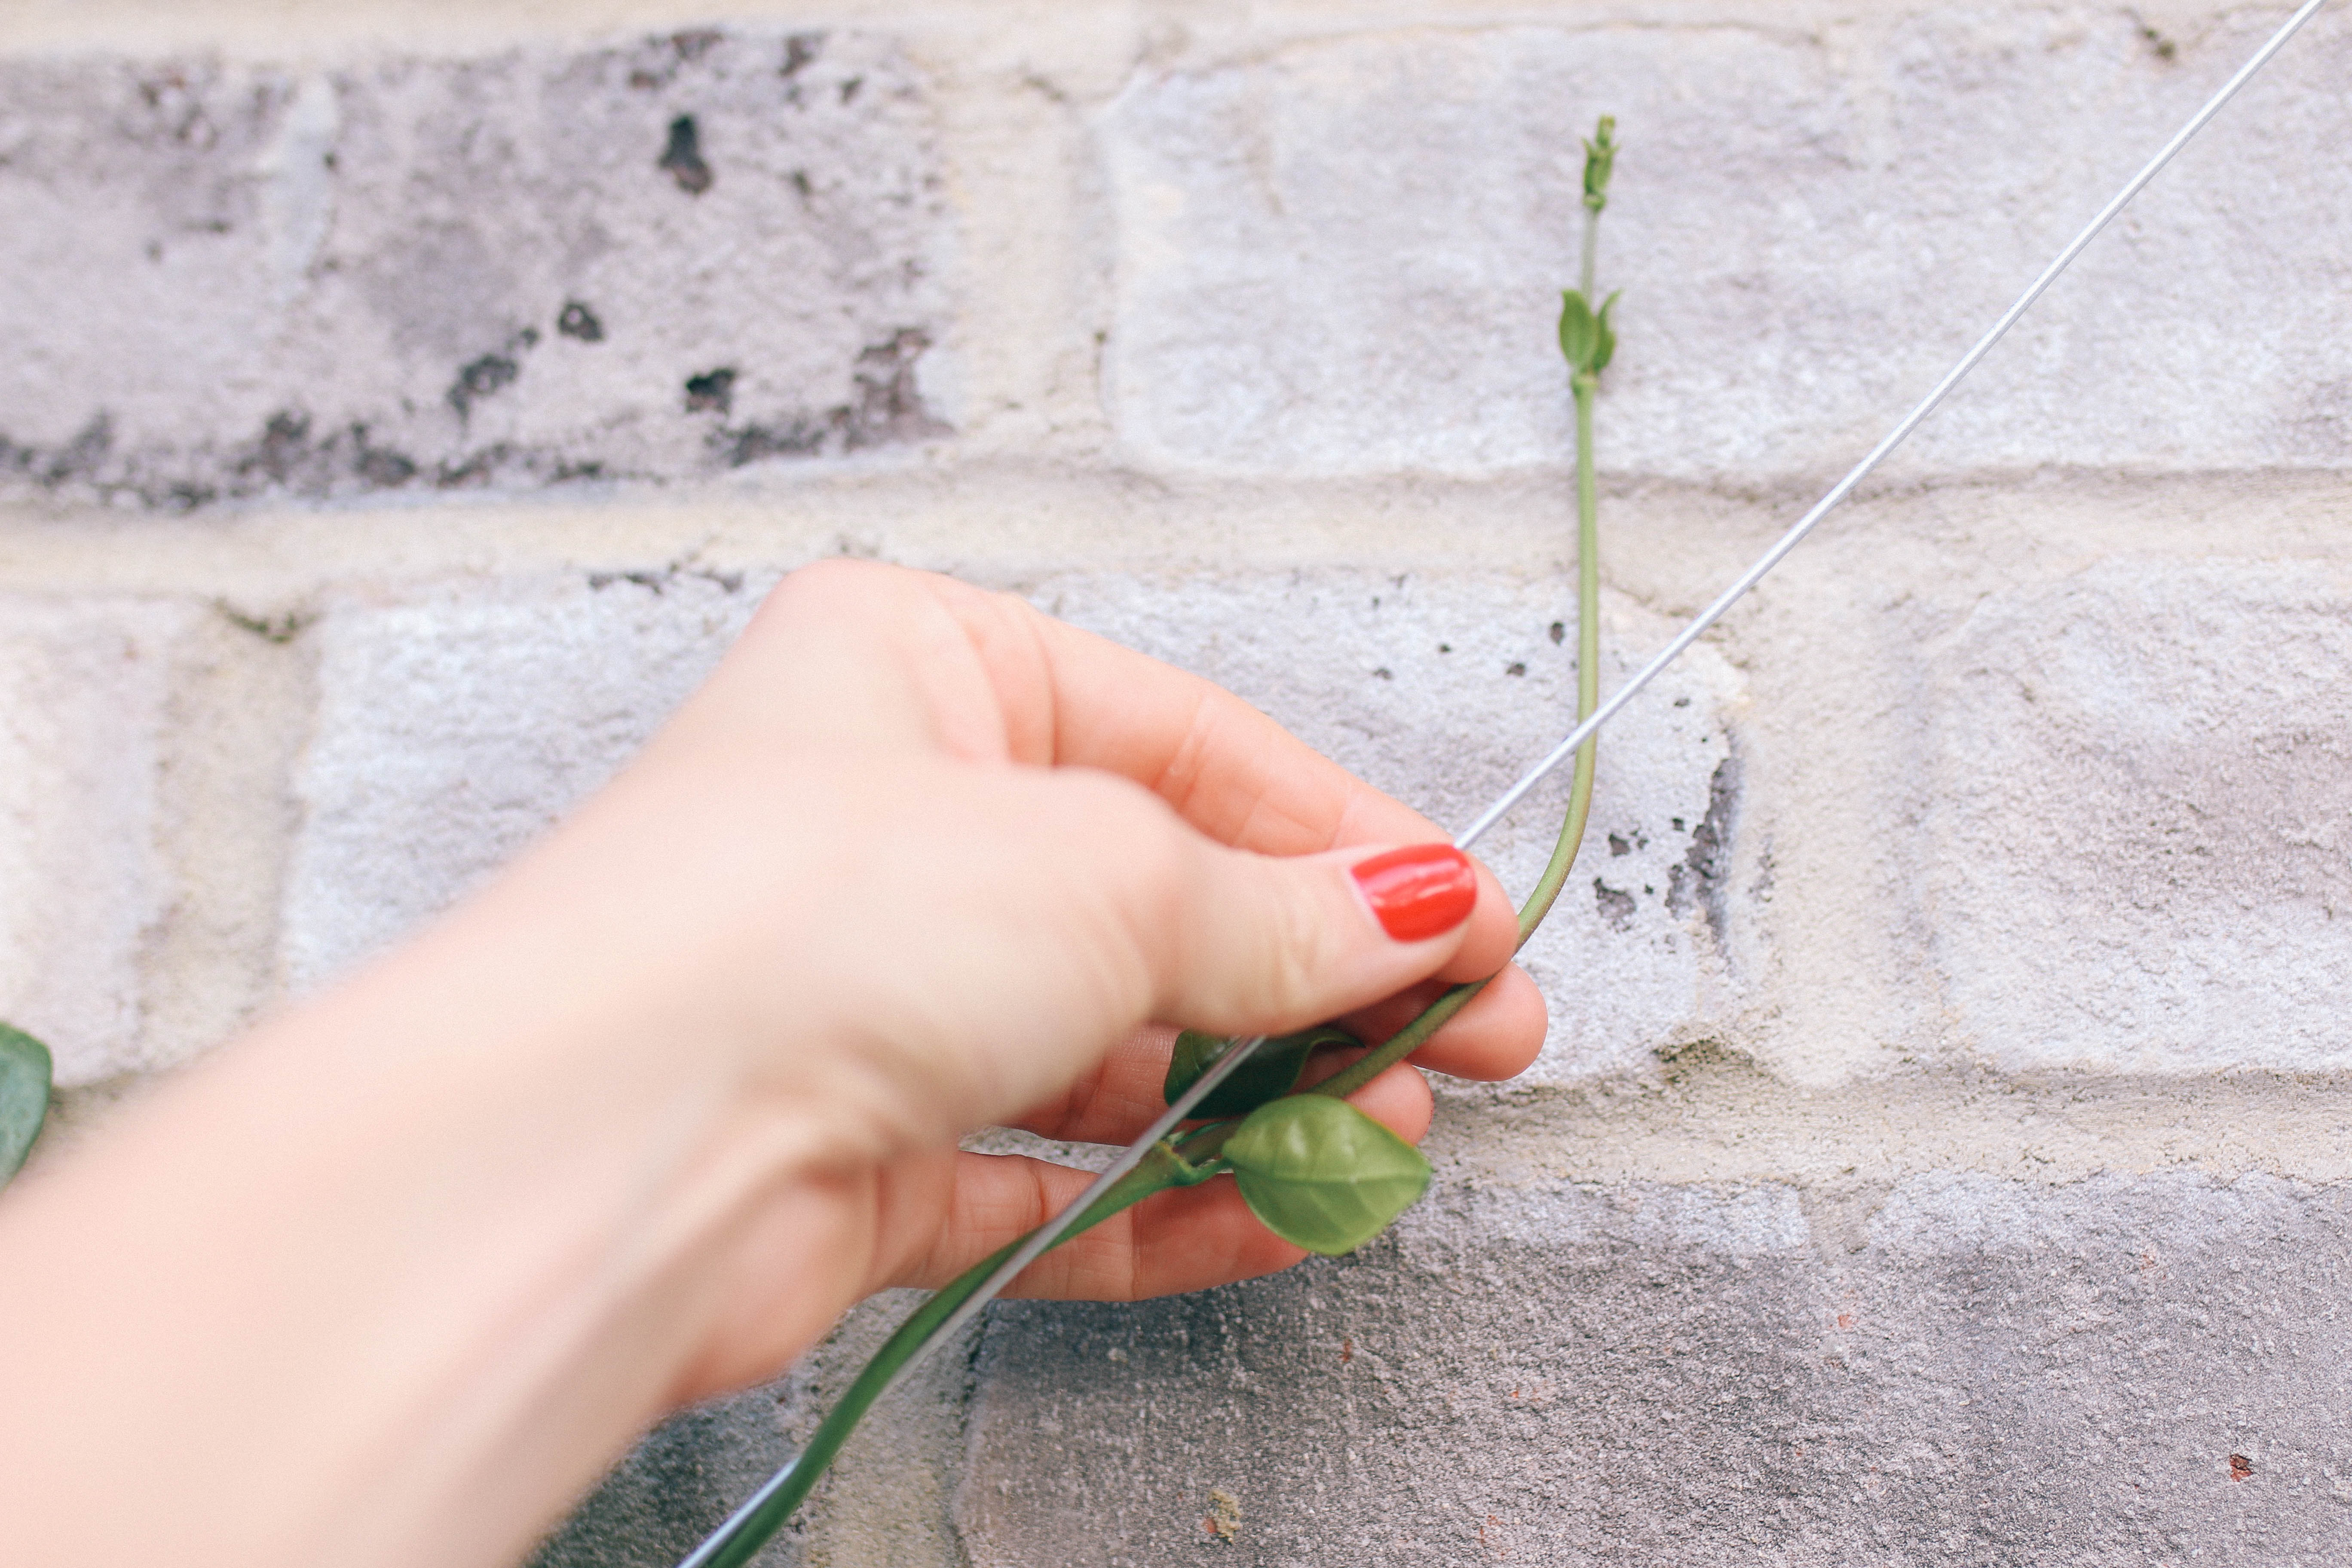
With your wires in place it’s time to plant! Place your plants close the wall and in a position where it can easily reach the lowest point of your structure. For our trellis, we used four, three gallon Madison Jasmines vines planting one beneath each outside nail and two underneath the center nail. Take each tendril and wrap it around the galvanized wire.
Tip: If your plant needs a little extra help staying in place you can use garden ties.

Step 6: Water & Grow
Water as necessary according to the plant/ vine chosen. You will need to encourage new growth to follow your pattern by gently wrapping it around the wires. Fertilize using liquid Miracle Grow once every two weeks.


Phew! What was a relatively easy task to assemble deemed itself somewhat challenging to describe. But, alas, we made it! Hopefully this guide makes it simple for you to create a beautiful garden trellis of your own. If you have any questions whatsoever, please leave them in the comments section below or email me at taylorrae@stylesouffle.com. This post was unlike anything I have shared in the past on Style Souffle, so let me know if you would like to see more DIY’s, an inside scoop on interiors or anything of the type!
Happy DIY’ing,
TR
Oh this is a wonderful way to decorate a bare wall! Thank you so much for the tutorial! Will have to show this to my Mom!
Hi there!
Right?! I thought it added something to an otherwise empty space! Thank you for the kind words. I hope your mom feels inspired to create one of her own!
Good luck,
Taylor-Rae
Want to do this but, worried about attracting too many bees with the jasmine flowers. Has that been an issue?
Hi! Fortunately, we have not had an issue with bees. We’ve had an issue with birds nesting in the trellis.
This was sooooo helpful! I wanted to do this in my backyard but was confused on how to start. No ONE provides information on how to measure to create this design. Thank you so much!!!! I am going to get started ASAP….
Hi Valerie!
I appreciate your comment so much! When putting together the blog post, my goal was to be as detailed as possible. I’m so glad you found it helpful and easy to follow! I agree, most of the guides out there are very vague. I’d love to see what you created! I’m sure it’s a beauty!
Good luck with everything!
I know you said the height of your design was 8′, but what was the width of your design?
It looks great and we plan to use your instructions to build our own wall!
Thank you!!
Hi Hannah,
Great question! The width of the structure is about 12 ft.
I’m so glad you found the post helpful! Our trellis is on year two and going strong!
Please, please send me pictures of your wall once it’s completed! I would love to see what you create. Also, I’m always happy to answer any questions you have. Feel free to send me a message via Instagram (@stylesouffle), if that’s easier for you. My email is also, taylorrae@stylesouffle.com.
Good luck! 🙂
what nails would you suggest for a stucco wall?
Hi there! I asked our contractor and here was his response:
It depends on the age/ type of stucco. Older stucco was made using thick cement, in which case you would use a masonry nail.
Newer stucco is made using a thiner material and backed by wood, so a long, thick wood nail would work fine.
If you are unsure, he recommends a masonry nail. You shouldn’t run into any issues however, if you notice it’s a loose fit (moves around once hammered-in), than use a thick wood nail.
I hope that helps! Feel free to email me a picture of the stucco structure. Seeing it will
help me better recommend the best nail for the project! My email is, taylorrae@stylesouffle.com!
Love this project. The question I have is at the bottom of the wire it looks like it’s going in the ground by a stake or anchor and not just the nail from the wall. Could u clarify that for me? Going to attempt this project this weekend!
Hi there! How exciting! We used a metal stake to secure it in the ground!
looks great ! Did you anchor the bottom wire in the ground. cant tell from the picture if its in the ground tied to a stake and not the wall, and if so what type of stake did you use?
Hi Trevor!
Great question. We used a metal stake, securing the structure deep in the ground. Let me know if you have any other questions.
My cross cross is star jasmine and it is in full bloom how should I maintain the cross cross pattern after end of bloom? Cut the over growth, try to wind it around guise wire ?im unsure
Hi there!
It sounds beautiful! I cut ours back in thicker areas. In spots where I wanted more growth, I loosely wrapped those pieces around the galvanized wire.
I want to do this on my exterior garage wall. We have hardcoat stucco but my husband doesn’t want to nail anything into it. Do you have an idea for how to attach the wires without nailing into the stucco?
Hi Allie!
What is the material on the soffit – the overhang of your roof? You could create a wire structure between the ground and the soffit. You could bump up against the wall without actually putting any holes and damaging the structure. Let me know if that helps. Feel free to email over photos of this area and I’d be happy to ask our contractor. My email is, taylorrae@stylesouffle.com.
-Taylor-Rae
Hi, that is lovely. I bought all the materials this weekend and then realised that my wire looks a bit thick. Do you by any chance know the thickness of yours?
Hello question !
What if we want Keep our plants growing out of pots ? Would this work? Is there a specific pot type of pot that should be used ?
Hello! I’m sure that would be fine. The only issue I foresee you having is the plant growing too big for the container. When plants become root bound it can eventually chock itself and die. I wouldn’t want you to put a lot of work into building a structure and this happen. Any pot should do; just make sure it’s extra large in size to accommodate for future root growth.
Hi! We are working on this project right now! How do you get your wire so straight? We bought the same wire buts it’s bendy and wavy. Thanks for any tips.
Hello! We wrapped the wire very tightly around the nail as shown in the diagram. xx
Thank GOD for this post! I found such conflicting advice online for creating a trellis on our exterior brick wall. But you guys made the whole process SOOOO much easier! Kudos, and I look forward to checking out anything else you’ve posted about.
We used granadilla plants and are super happy with the results. We live in South Africa and planted them in March last year, our autumn and almost a year later we can’t believe how they’ve grown. We have over twenty granadilla fruits on them now!